
Infrared Thermometer PIR-550

The PIR550 is a special thermometer that doesn't touch what it measures. It has different modes for measuring things using infrared technology. Remember, don't let children play with it, and don't use it for important safety stuff.
To check the temperature of something, point the thermometer at it using the lens (number 9) and press the Measurement button (number 7). The Distance to Spot ratio is 12 to 1, which means you need to be somewhat close. Make sure the thing you're checking is in the thermometer's view.
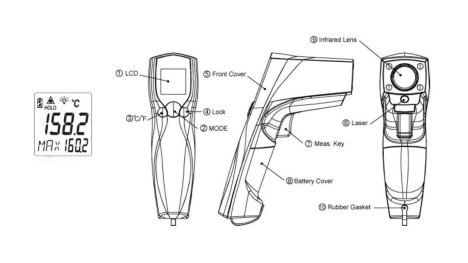
To access additional display functions, press the Mode button (2). This menu includes the emissivity setting, which defaults to 0.95. Press Mode (2), then use the Lock button (4) or ℃/ ºF button (3) to adjust the emissivity. Confirm the setting by pressing Mode (2). Emissivity can range from 0.10 to 1.
Press Mode (2) again to select modes like Maximum (MAX), Minimum (MIN), Difference between MAX and MIN (DIF), and Average (AVG). These modes display alongside their icons during measurement.
You can also set High Alarm (HAL) and Low Alarm (LAL) by pressing Lock (4) or ℃/ ºF (3), and confirm using the Measurement button (7). If the reading goes beyond these alarm limits, the respective icon will flash, and a beep will sound.
WARNING
- AVOID DIRECT EYE EXPOSURE TO THE LASER BEAM DURING USE TO PREVENT PERMANENT EYE DAMAGE.
- HANDLE THE LASER WITH EXTREME CAUTION.
- NEVER AIM THE DEVICE TOWARDS ANYONE'S EYES.
- ENSURE IT IS KEPT AWAY FROM CHILDREN'S REACH.
STORAGE & MAINTENANCE Store at room temperature. The thermometer's sensor lens is delicate; maintain its cleanliness using a soft cloth or cotton swab with water or medical alcohol. Let the lens fully dry before use. Avoid submerging any part of the thermometer in liquid.
The thermometer provides visual alerts for different situations:
- It indicates 'Hi' or 'Lo' when the measured temperature goes beyond HAL and LAL settings.
It displays 'Er2' if the thermometer encounters rapid ambient temperature changes.
'Er3' appears when the ambient temperature goes above 0°C (32°F) or +50°C (122°F). To stabilize the thermometer (around 30 minutes), allow it to adapt to the room temperature.
To address errors 5-9 or other messages, perform a reset. Turn off the thermometer, remove the battery for at least a minute, reinsert the battery, and power it on. If the error persists, reach out to the Service Department for assistance.
BATTERY REPLACEMENT
- Gently remove the rubber gasket (part 10).
- Undo the screw and open the battery cover.
- Swap out the old batteries for fresh ones.
- Secure the battery cover and tighten the screw.
- Reinsert the rubber gasket (part 10) to maintain water resistance.
When the 'Low Battery' icon signals low power, replace the batteries promptly with AAA, 1.5V batteries. Important: Turn off the thermometer before changing batteries to prevent malfunctions. Properly dispose of used batteries and keep them out of children's reach.
Technical Properties:
- Measurement Range: -60°C to 550°C
- Operating Range: 0°C to 50°C
- Accuracy: Measured value ±2% or ±2°C
- Emissivity: Adjustable from 0.1 to 1.0 (default value: 0.95)
- Response Time: 1 second
- Distance to Spot Ratio (D:S): 12:1
- Battery Life: Minimum 14 hours of continuous use
- Dimensions: 143.9 x 116.73 x 42.78mm
- Weight: 180 grams (6.35 oz) including 2 AAA batteries
Note on EMC/RFI: Readings may be affected if the unit operates within a radio frequency electromagnetic field strength of approximately 3 volts per meter, but the instrument's performance will not be permanently impacted.
-
 PRODUCT REQUEST FORM